You can make this “Pillow Lounge Cover” in 6 easy steps! My grandchildren needed seating and I took on the challenge to find a chair or something that I could make that they would get good use of for several years to come. I initially found the Pillow Lounge on Wayfair and Amazon and thought to myself ” I can make that!”

Anyway, I fell in love and with them and it’s so easy to achieve the look.
After a glance on Pinterest, I found several examples of the Pillow lounge tutorials and finished products, but only one resembled the look that I was trying to achieve. I came up with a way to get the commercial look with the Velcro closure placement to smooth out the edges.
It only takes 6 steps to achieve the look between $25 to $30 yourself. Now before we get started I found that the cover cost the same amount if you purchased it, but DIY includes the pillows and a throw cover too! So let’s get started.
Supplies:
2 yards of fleece fabric (3 yards will allow you to make a coordinating throw blanket.)
2 yards of sew-in velcro
4 pillows (I found pillows at Walmart for $5.00 each, but there are some cheaper ones too!)
*coordinating thread1 1/2 -2 hours with measurements
Step 1: Measurements
Fold the fabric lengthwise and place the pillows on top to ensure you will have a 1/2 inch seam allowance on each end. Also, measure the length of the pillows and where you will put the Velcro. My pillows measurements said 28″ L X 17″ W, but my measurement was 26 inches on the length instead. That meant that I needed to cut off 2 inches from the width of my fabric to allow for the 2-inch fold placement of the Velcro.

Step 2: Velcro Placement
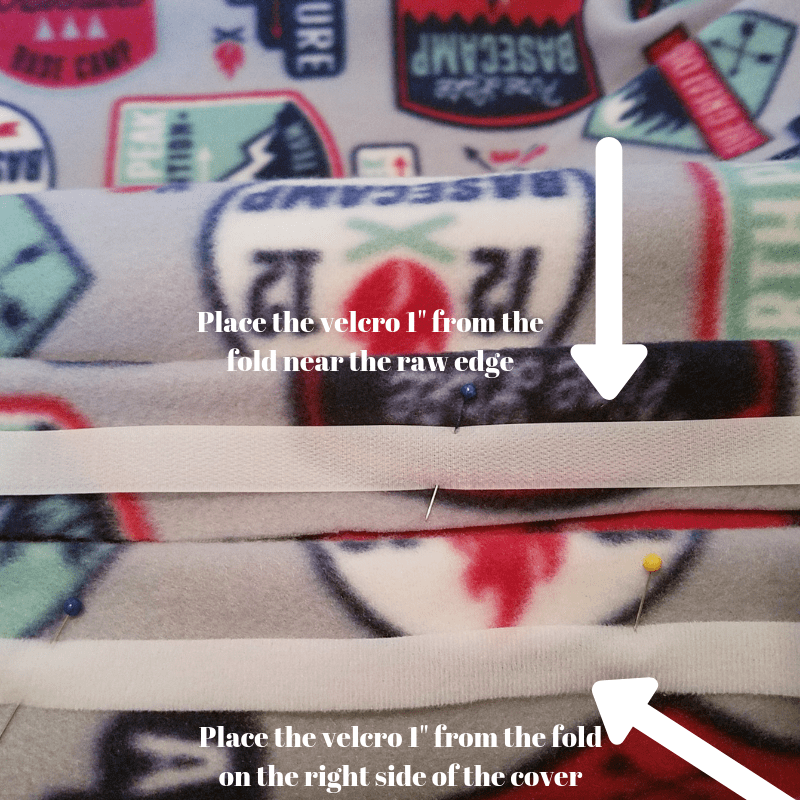
Fold the length of the bottom and top of the fleece toward the pillow 2 inches and pin in place. Pin the Velcro soft side beginning at the edge of the fold 1/2 inch away from each edge and 1 inch below the folded matching the raw edge of the fabric. (The picture shows the rough side of the Velcro near the edge. I quickly learned that when you slide the pillow into the cover this will scratch your hands and arms.. So use the soft side there instead.)
Pin the Velcro rough side 1″ on the outer fold of the fabric to create a smooth flap.
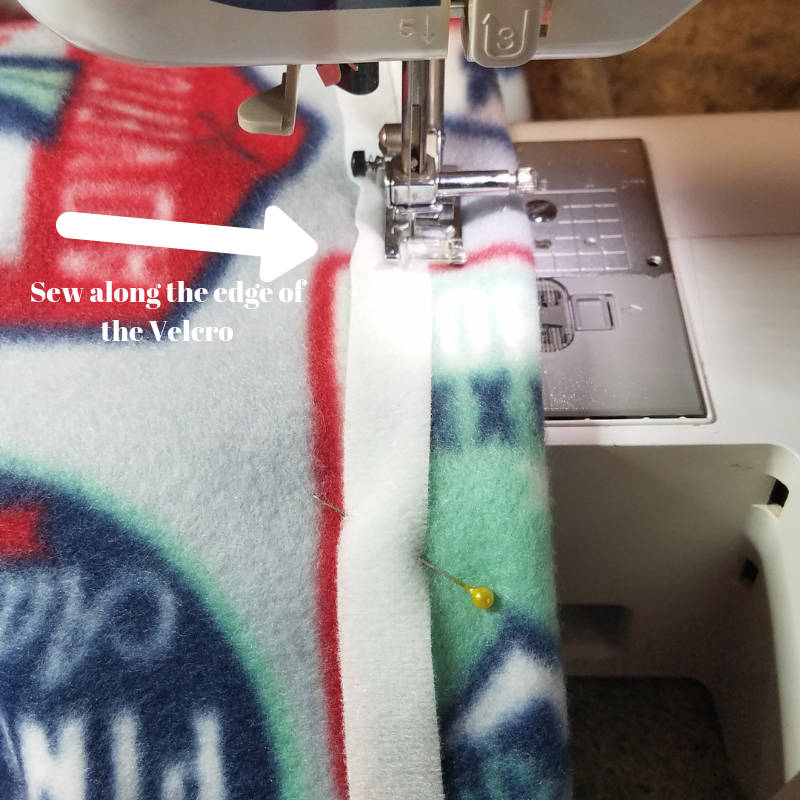
Sew around the edge of the Velcro to secure on the fabric.
Close the cover with right sides of the fabric together and sew each end of the cover together using 1/2″ seam allowance on both ends.

Step 4: Measure Your Center Seams
Place all of the pillows in the cover and double check your measurements for the center seams along the cover. You don’t want more room leftover on any one section. I measured 17′ for each seam.

Step : 5 Sew Center Seams
Measure and sew the seams in between the pillows. I used the width of the pillow as my measurement. My pillows measured 17″ in width and I drew a line below the Velcro to the end with a pencil at the 17′ mark. I also marked the lines with stick pins 2″ inches from the Velcro folded edge to help me find the line when I started to triple stitch on the marks on the fleece. I didn’t want to sew over the Velcro because it would buckle the folded closure. (Make sure to start your seam 2″ away from the Velcro closure.)

Step 6: Add Pillows
Stuff pillows in each opening and close the flap to secure. Let your child enjoy! I had to make two.


Pin This for Later!

Do you have a tutorial you would like to share? Click on the menu tab to submit your sewing tip! If you have any comments or questions about the tutorial please leave them in the comments below.
Stay tuned there’s more to come from LaCartera!

