
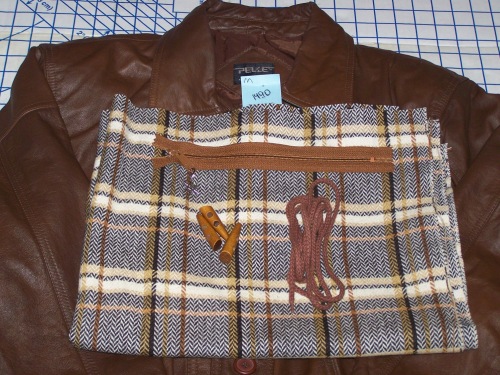
The e-tablet clutch tutorial offers a creative and unique design that allows you to store, or carry your electronic tablets and readers. K&C Supplies provided the zipper, toggle button and the adorable snowflake zipper pull. My fabric choices for this tutorial are vintage wool as my primary fabric, and leather that I upcycled from a leather trench coat found at a second hand store for $14.00. Go ahead – select your favorite fabric color combination, checkout the K&C link above for supplies and lets get started!
Materials Needed :
- 1/2 yard of fabric (primary fabric)
- one fat quarter for front flap
- 1 yard of Pellon Stablizer interfacing (#71F)
- 1/2 yard for lining
- one zipper ( 9″inch)
- one zipper pull
- one toggle button
- one boot/shoelace (27 inches)
- one magnetic closure
- one D-Ring or Swivel ring
- Matching thread
- Schmetz Leather sewing needle (18/110)

Step 1:
(***Helpful Hint: Create your pattern using a paper drop cloth found in the paint section at your local hardware store. The recycled paper roll is 140-ft x 2.33 ft – cost $5-$10.) If you love to sew and make patterns this is worth the investment.
Pattern dimensions make one pattern piece for the following:
- Flap, which is also used for the clutch body – (15″inches width x 11″ inches length)
- Welt flap pocket (12″ inches width x 9″ inches length)
- Welt flap pocket trim (15″ inches width x 8 1/2 length
- Welt flap pocket interfacing (15″ inches width x 5″ inches length)
- Inside clutch pocket (12″ inches width x 7″ inches length)
- Key fob strap (2 1/2″ inches width x 9″ inches length)
 Let’s focus on the flap pattern, which is the main pattern piece. You can choose at this time to keep a square flap and clutch body, or round off the bottom corners.
Since I decided to use the rounded corners. I used a plastic coffee top as a template to measure the roundness I wanted. Cut your corners and prepare for the fabric.
Step 2:
Use the flap pattern to cutout the following: 
- Primary fabric; two clutch panels (front and back) and one back flap panel
- Cut three interfacing
- Cut two Lining
- Coordinating Fabric: one front flap panel
Cut out remaining pieces:
- Primary fabric; one welt pocket trim
- Lining; cut one welt flap pocket on the fold
- Cut one welt flap pocket interfacing
- Primary fabric; one inside clutch pocket
- Primary fabric: one key fob strap
Step 3:
Create a welt zipper pocket on the flap. If this is your first time attempting a welt zipper pocket (*** Helpful Hint: Use scrap fabrics to practice this technique first.)
Iron the fusible welt pocket interfacing to the back of the front panel 3″ inches from the top of the panel.

Step 4:
Place the welt trim on the front panel with the right sides together matching the top edges. Center the zipper 5″ inches from the top of the flap panel leaving 2″inches on each side. Mark the center line where the you want the 9″ inch opening.


Since my zipper is one and 1/4″ inches wide, I measured 1/2 above and below the center line and created a rectangle. On each end of the rectangle on the top a bottom draw a diagonal line from the corner to the center line to create a triangle on each end.

Step 5:
Sew around the rectangle on the outer edges only. Once completed check the back of the panel to inspect your final stitches.

Step 6:
Fold the panel in half with the wrong sides together and ensure that the stitches are aligned evenly. Make a 1/4″ inch cut on the center line and lay the flap panel flat to continue cutting on the center line. Stopping at the pointed tip of the triangle.

Cut each diagonal line of the triangle keeping the triangle in tack.

Step 7:
Turn the panel to the opposite side to inspect your opening, and pull the pocket trim to the opposite side of the panel.


Step 8:
Lightly iron the opening to expose 1/4″ inch of the trim. Place a cloth on top of the leather to avoid burning. Fold and pin the trim in place to prepare for the placement of the zipper. (Try not to puncture the leather with the pins.)


Step 9:
Before inserting your zipper, sew the end of the zipper that does not have a stopper. Sew two or three seams on the end.

Center the zipper with the opening, and ensure that the metal pieces will not inhibit your sewing. Pin in place along the edge of the pocket trim. Using the zipper foot, sew along the edges of the trim closest to the zipper. This will leave enough of the zipper exposed to attach the pocket to the zipper.

Step 10:
Place the lining right side down on top of the edge of the bottom section of the zipper. Temporarily pin in place. The lining should extend pass the top of the flap as shown here. 
Pin the lining in place behind the welt pocket trim along the very edge of the zipper on top of , or as closest to the recent zipper seam. Make sure that you gather the material behind the welt pocket trim and remove the pins you temporarily added. You want to sew along the ditch of your original welt zipper pocket cut on the fold. ** Move the leather and the remaining pocket material out-of-the-way. You do not want to sew or catch any of these material. ***

Once you make your seam, lay the lining flat to expose the opening of your zipper and lightly press your pocket seam to make sure your pocket has the perfect finished edge.

Fold the pocket in half and match the top of the pocket to the top of the welt trim. Pin in place to hold. *Do not sew the top of the pocket until you have attached the pocket to the zipper. To attach the pocket to the zipper repeat the process above: making sure you gather the material behind the welt pocket trim to sew along the ditch of your original welt zipper pocket cut fold. ** Move the leather and the remaining pocket material out-of-the-way. You do not want to sew or catch any of these material. ***

Now that the pocket is attached to the zipper. Sew the pocket closed sew 1/2″inch along the top of the pocket attaching the trim and sides of the pocket only. Double stitch the bottom side seams of the pocket to complete.

Here’s the finish look of the welt pocket.

Step 11:
Iron the fusible interfacing to the back flap panel. Sew the front and back flap panels together. With the right sides together sew 1/2 ” inch seam around the sides and the bottom of the panels. (*** Helpful Tip: If you are using leather, use rubber coated or plastic paper clips to hold in place your fabrics together before sewing to avoid puncturing the leather.)
Mark the middle of the bottom of the flap to insert your toggle button latch. (Fold in half to find the center.)

Insert 7″ inches of the boot/shoelace into the eyelets of the toggle button and knot in place. You will need 3 1/2″ inches of exposed shoelace on each side.

Remove the stitches necessary to insert the toggle button and laces. Insert the toggle button in between the two panels with the laces exposed at the bottom of the panel and double stitch the opening closed. Cut the exposed laces even with the panels.

Turn the flap to its right side and iron your seams flat.
Remove 1″ inch of the interfacing at the top of the flap opening. This will remove some of the bulk when sewing the flap closed. Fold the fabric inside the flap 5/8″ inch and sew along the very edge to finish the seam. (** If sewing leather see the next Helpful Tip.)

(***Helpful Tip: Coat the leather with machine oil or WD-40 oil using a Q-tip. Spray the oil into a small container, and dip the Q-tip into the oil to apply on top of leather section you will sew. *** Also use a slightly looser stitch when sewing.)
This technique will stop the leather from slipping and bunching when sewing.

Step 12:
Iron the fusible interfacing to the front and back panels of the clutch. At this time remove one inch of the interfacing at the top of the panel. Pin right sides together and sew around the sides and the bottom of the panels, leaving the top open.

With the right side of the back clutch panel facing you, measure 3″ inches from the top of the clutch and mark with chalk. Pin or clip the top of the flap to the 3″inch line and allow a 1/2 seam allowance on each side. Sew the flap right side up to the right side of the back clutch panel.
Use the finished seam on the top portion of the flap as a guide for your presser foot. The needle position should be to the left side of the presser foot closest to the existing seam as shown here.

- Sew the front and back clutch panels together using a 1/2″inch seam allowance, leaving the top open.
Add the toggle button closure to the bottom of the clutch panels.:
- Cut shoelace 4″inches long.
- Mark the placement of the shoelace closure at the center bottom of the clutch. Remove the stitches where you will place the shoelace.
- With the ends of the shoelace together place inside the bottom of the clutch and double stitch close.

Turn clutch to the right side, and fold the top edges of the panels one inch towards the inside of the clutch, and pin in place.

You want to achieve this finished look.

Step 13:
Take your inside pocket and fold the edges 1/2″inch under and fold over again 1/2″ inch. Sew a 1/4″inch seam around the entire pocket to create a finished edge.

Place the pocket on the right side of the back panel of the lining. Measure 2″inches from the top and sides of the lining. Center and Pin in place.
Sew the pocket with a 1/4″ inch seam allowance onto the back panel of the lining attaching the sides, and the bottom of the pocket. Double stitching the top edge of each side of the pocket.
Mark the center of the pocket or, measure the width of your mobile phone. Sew a seam from the top of the pocket to the bottom.
Place the two right sides of the panel lining together and sew 5/8″ inch around the sides and bottom, leaving the top of the panels open.

Step 14:
Turn the lining to the wrong side, and place inside the purse. Fold the lining top toward the clutch panels, and pin the lining in place leaving 1/4″inch from the top of the clutch.

Prepare the installation of the magnetic closures one inch from the center top of the clutch onto the lining. The placement of the thickest part of the magnetic closure is placed on top of the inside pocket and through the lining.
Using the manufacture’s directions install the closures. ( ***Helpful hint: Use an ink pen or marker to mark the placement of the magnetic closure prongs. I use a seam ripper instead of an exacto knife to make the slits for the magnet prongs. After I insert the seam ripper into the fabric, I gently pull down on the seam ripper through the fabric to create an opening.)

Install the magnetic closure onto the lining. (***Helpful Tip: Cut a square piece of the fusible interfacing slightly larger than the magnetic closure. Adhere the interfacing behind the lining where you will install the magnetic closure.) This will add stability to the magnetic closure area.

Step 15:
Fold the key fob strap in half and sew a 5/8″ inch seam down the side to close. Turn the strap to the right side and iron flat. Place the strap through the D-Ring and fold in half. Insert the raw edges of the strap in-between the lining and the front side clutch panel, and pin in place. (*** Do not place the tab on the side seam to avoid additional bulk when sewing.)
Sew along the edge of the lining to close the clutch. Keep the clutch open and steady as you sew the lining and clutch panels closed and ensure that the flap panel is out-of-the-way when sewing.

Add your zipper pull and the e-tablet clutch is complete. If you have any questions don’t hesitate to contact me. Please share this tutorial and make plenty of these for family and friends!

Stay tuned there’s more to come from La Cartera!
Related articles
- E-Tablet Clutch- Is it a Hit or Miss? (lcartera.wordpress.com)


Amazing job!
Remind me my tutorials 🙂
LikeLike
🙂 Thank you! You’re the best, so that’s a great compliment!
LikeLike
Great and thorough tutorial! thank you.
LikeLike
Thank you, and enjoy! Please share your version of the e-tablet. I would love to brag about it on my blog!
LikeLike
WOW! Such a great tutorial! I love the finished piece. Gorgeous colors. Thanks for sharing.
LikeLike
Thank you Alexandra! 🙂
LikeLike
So love a tutorial with beginning, middle and end. Sometimes parts of left out! You rock this tut!!!
LikeLike
Your comment means a lot to me! I really tried to cover all of the bases, and worried that I may have added too much. Thank you for the feedback! 🙂
LikeLike
This is great! Didn´t miss a single step shutterbug 😉 Hopefully I´ll have time to try it!
LikeLike
🙂 Thank you! Please let me know when you give it a try!
LikeLike
Great tutorial! I love how you upcycled that leather jacket, It turned out great!
LikeLike
Thank you!
LikeLike
Really great tutorial and bag. May have to pull my sewing machine out of the closet for this one!
LikeLike
Thanks…sounds like a great plan! 🙂
LikeLike
This was so amazing I loved it thanks for sharing Lacartera!
LikeLike
Thank you ! You are very welcome. Let me know if you give it a try.
LikeLike
Will do 🙂
LikeLike
🙂
LikeLike