 The Sunflower Purse Tutorial is simple to make with two round placemats. The handmade beaded handles add extra interest to textured placemats.
 Materials Needed Purse:

- Two thin standard round indoor/outdoor placemats (14 inch length x 15 inch width)
- Thread should match placemats
- Lining fabric (your choice)
- Magnetic Closure
Materials Needed Handels:
- 18 large wooden beads
- 16 medium beads
- 24 small beads
- Multipurpose wire 16 gauge (3 1/2 ft.)
- Needle nose pliers
- wire cutters
Step 1:
Using the placemat as a template, cut out two lining pieces.

Step 2:
Fold the placemats 4 inches from the top. Apply pressure to create a crease on the fold. Although, I love to iron my folds, I didn’t attempt to iron the polyester synthetic material. I was afraid that It would melt. 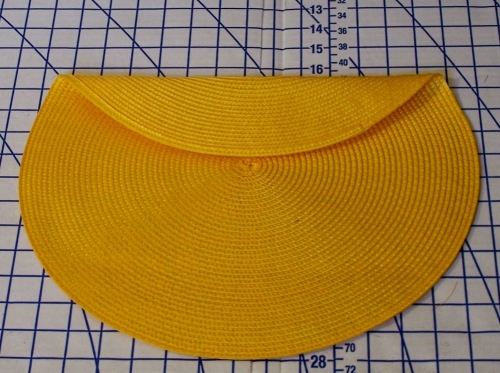
Step 3:
Remove one inch from the top of the fold to create the handle tabs from each placemat. I used a marker to highlight my measurements to make an easy cut. The handles are now one inch width x 8 inch length. Cut each strip in half to create your four handle tabs, which you will attach to the purse.

Step 4:
Sew a binding stitch across the raw edge of the handle tabs, and the two placemats that are now your front and back purse panels. The material frays almost like straw, so you want to salvage your material.


Step 6:
Fold each tab 1/2 inch lengthwise to hind the binding stitch. Sew a single stitch down the center of the tab on top of the binding stitch. This will not be perfectly straight, because of the curve of the placemat. It is important to attach the center portion of the tab, because it will be seen. The ends of the tab will be covered by the placemat and the lining when folded.

Step 7:
Pin the two placemats right sides together with the folded edges down. Starting at the top of the fold, sew a straight stitch along the edge of the placemats. Back-stitch or double stitch at the beginning, and at the end of your stitches on the very top fold.

Step 8:
Attach the handle tabs. Turn the purse to the right side to get accurate measurements of where to place the tabs. Pin the tabs 3 inches from the side seams on the front and back handles of the purse. Only attach one end of the tab to the purse. This will allow you better control when attaching the handles and the lining.

Attach the handle tabs to the purse using a single stitch and stitching over the stitch 3 times. Also back-stitch at the beginning and ends of each seam.

Step 9:
Match the lining right sides together and fold the top of the lining 4 inches from the top. I gently ironed the fabric lining to hold the crease and pinned the right sides together.


Sew the right sides together, back-stitching the beginning and ending stitches on the top fold. Pull the fold down 1/2 inch to cover the top seams, and gently iron.
Step 10:
Turn the lining to the right side, and place inside the purse. Pin the lining in place leaving a half-inch from the top of the purse. Prepare the installation of the magnetic closures 1 1/2 inches from the top of the lining. Attach the magnetic closure onto the lining. Install in between the tabs.
My measurements were directly in the center. I found that the magnetic closures are attracted to my bobbin cover and presser foot. This time I wanted to give a little space to manage the pull of the magnet. Using the manufacture’s directions install the closures.
Helpful hint: I use a seam ripper instead of an exacto knife to make the slits for the magnet prongs. After I insert the seam ripper into the fabric, I gently pull down on the seam ripper through the fabric to create an opening.


Step 11:
Creating beaded purse handles: Cut 3 1/2 inches of wire and fold in half.

A. Slide six small beads on a single strand wire. Twist the wire twice to create a D-Ring pictured on the left. Leave enough room at the orignal folded wire position to slide the handle tabs through. Twisting the wire will create a stopper for the small and large beads.
B. Place a large wooden bead over both wires to create a sturdy handle. Create your design interchanging large and medium beads.

C. After placing the last large bead onto the wire. Wrap one end of the wire, and create a knot as a bead stopper and hide the knot under a large bead. With the remaining exposed wire, slide six beads on the single wire to create another D-Ring. Pull the end of the wire through the large bead using needle nose pliers. Secure the single wire around the exposed wire and tie a knot, which will be hidden under a bead.
Step 12.
Place the handle tabs through the end of the beaded handle D-Rings and pin in place.

Sew along the edge of the lining to close the purse and attach the purse handle tabs. Above the original stitches on each purse tab, sew at minimum 3 reinforcement stitches. Back-stitch at the begning and end stitches on each tab

The Sunflower purse is now complete. If you have any questions don’t hesitate to contact me. Have fun and enjoy your purse this summer!
Stay tuned there’s more to come from La Cartera!
Related articles
- Creme de Menthe Purse Tutorial (lcartera.wordpress.com)
- Paisley Park Purse Tutorial (lcartera.wordpress.com)
- Tangerine Foldover Clutch Tutorial (lcartera.wordpress.com)


What a great tutorial as usual! This is such a cute purse! Thanks for posting!
LikeLike
Thank you, Sandy! Let me know if you make one. I think I’m going to try this design in different colors, and thanks for viewing.
LikeLike
How sweet, just in time for Spring!
LikeLike
Yes, and it would be great for summer too. 🙂
LikeLike
Brilliant idea and very thorough tutorial.
LikeLike
Very creative! I love re-using things…
LikeLike
Thank you!
LikeLike
I’m sorry to say I finally got the chance to go through a whole tutorial! And I enjoyed it a great deal. You certainly have a gift with your craft, easy to follow instru
LikeLike
Thank you! I so glad you enjoyed it. .
LikeLike
Instructions, thanks for sharing 🙂
LikeLike
You’re very welcome!
LikeLike
Reblogged this on reemdn.
LikeLiked by 1 person
Thank you, I’m so happy and I hope you find the tutorial helpful!
LikeLike